How to Design Characters With AI for Games and Animation

In this article▾
Designing a character with AI is a five stage pipeline, not a single prompt: write a brief, generate concept passes, lock identity on a turnaround sheet, convert to 3D and rig, then export to your engine. Teams that treat it as one prompt get pretty images that fall apart the moment the character needs a second pose. Wireflow lets you chain the image, consistency and 3D models in that order on one canvas, so the same reference feeds every downstream step instead of being re-described each time.
This guide covers what each stage produces, which model class handles it, and the settings that decide whether the asset survives contact with a game engine. For the 3D stage, our comparison of the best Hunyuan3D v3 tools ranks six ways to turn a concept image into a textured mesh.
Stage 1: Write a character brief before you touch a model
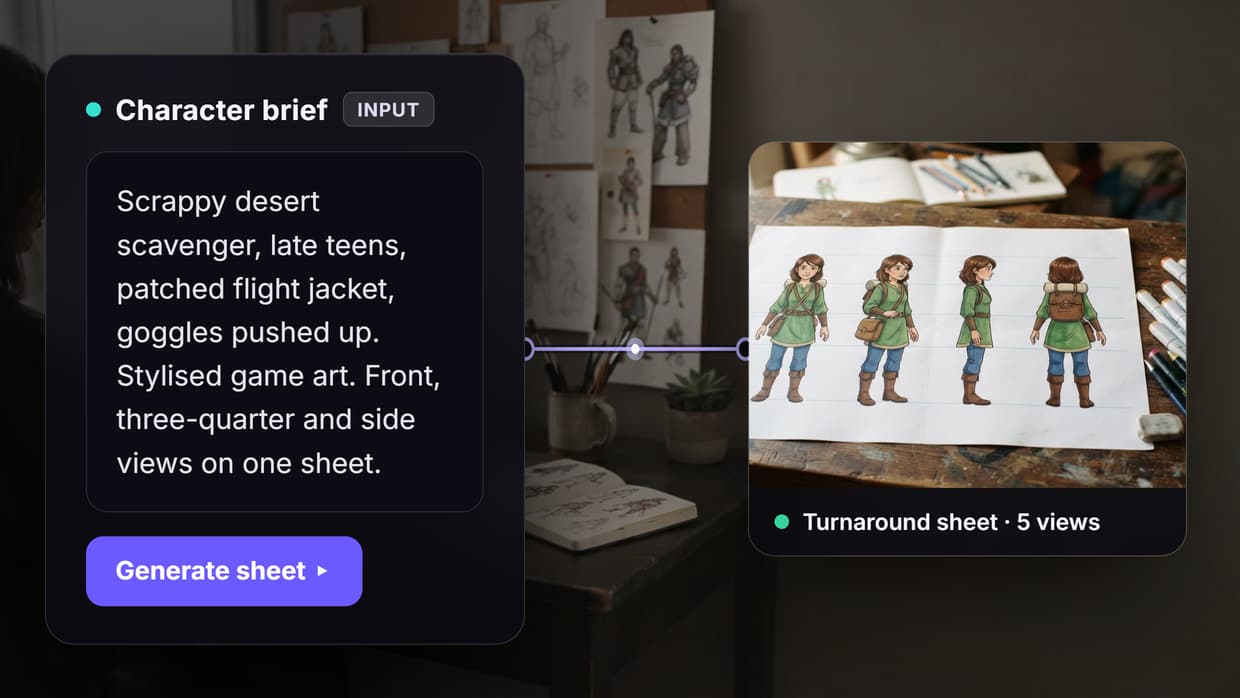
The brief is the only part of this process AI cannot do for you, and it is where most output quality is decided. A usable brief names five things: role in the game or story, silhouette, personality read, palette, and material language. "Scrappy desert scavenger, late teens, tall narrow silhouette with a heavy pack breaking the top line, patched flight jacket, sun-bleached ochre and faded teal, worn canvas and scratched metal" gives a model far more to hold onto than "cool post-apocalyptic character."
Silhouette deserves its own line. In a game, players read characters at small on-screen sizes and in motion, so the shape needs to be identifiable in solid black before any detail exists. Once the character reads clearly, an AI motion graphics maker can animate a title card or logo reveal to sit alongside it. Broader concept-stage thinking, including environment and prop language, is covered in our guide on using AI for concept art and game design.
For a hands-on version of this stage, the AI character creator page runs the same brief-to-sheet setup with the fields already wired up, so you can see what a structured brief produces before building your own chain.

Brand marks get the same treatment through AI logo animation on the node canvas.
Build this in Wireflow
Make the same kind of asset on a canvas you control, with a free account and no credit card.
Stage 2: Generate concept passes, not a single hero image
Run the brief through an image model at high variation first. The goal is four to eight distinct interpretations, not one perfect frame. Vary one axis per batch: silhouette in the first batch, costume detail in the second, palette in the third. Judging eight side-by-side options against the brief is faster and more honest than iterating on one image you have already grown attached to.
Model choice matters less than people assume here, because you are shopping for shapes. Midjourney and the current Nano Banana and Recraft generations all produce usable concept passes; what differs is how literally they follow structured prompts. If you are calling models programmatically, the Nano Banana 2 API guide covers request shape and parameter handling for batched runs.
Pick one winner and one runner-up. Keep the runner-up: it usually becomes an NPC variant later. To reach those interpretations faster, a character sketch generator can rough out silhouettes and pose thumbnails before you commit a full render.

Stage 3: Lock identity with a turnaround sheet
This is the stage that separates a nice picture from a production asset. A turnaround, or model sheet, renders the same character in five orthographic views: front, three-quarter left, side, three-quarter right, and back, at a consistent height and lighting. Add an expression strip of six to eight faces and a costume variant row if the character changes outfits.
Consistency across those views is the hard part, and prompting alone will not get you there. Three techniques do:
- Reference-image conditioning. Feed the approved concept back into the model as an image input rather than describing it in words. This single change fixes more consistency problems than any prompt rewrite.
- Pose control. Condition each view on a pose skeleton or a simple mannequin render so the model changes camera angle rather than redesigning the character.
- A trained character adapter. Once you have 15 to 30 approved images of the character, a small LoRA-style adapter makes every later generation, including new poses years into a project, snap back to the same identity.
The identity-consistency problem shows up in narrative work too, and the approaches carry over directly from our write-up on creating AI characters for games and stories.
Export the sheet at 2048 pixels per view minimum. You will be reading small details off it for the rest of the project.
Stage 4: Convert to 3D and rig
Image-to-3D is now the default route for stylised characters: you feed the front and side views from your turnaround and get a mesh with base textures. Text-to-3D still exists, but it throws away the identity work you just did, so use it only for background props. For a reference-led starting mesh, Hunyuan3D v3 turns the concept image into a textured asset for cleanup before rigging.
Three things determine whether the result is usable:
| Check | Target | Why it matters |
|---|---|---|
| Triangle count | 1K to 300K depending on platform | Mobile and crowd characters need the low end; hero characters can carry the high end |
| Texture resolution | 512px background, 1K NPC, 2K hero, 4K concept only | Oversized textures are the most common memory overrun in AI-sourced assets |
| Skeleton size | Under 256 bones for Unity | Auto-rigs can exceed engine limits and silently fail on import |
| Export format | FBX, glTF, or OBJ with a PBR set | You need diffuse, roughness, metallic and normal maps, not a single baked colour map |
Auto-rigging has closed most of the gap for humanoid characters. Tools in this class generate an animation-ready skeleton in well under a minute and ship motion libraries you can retarget onto the rig immediately. Non-humanoids, quadrupeds, multi-limbed creatures and anything with a tail, still need manual rigging; auto-riggers assume a biped layout. If your pipeline is API-driven rather than desktop-driven, the landscape of game asset pipeline APIs is worth reading before you commit.
Retopology is not optional on generated meshes. Image-to-3D output tends toward dense, uneven triangles that deform badly at joints, so a retopology pass before rigging saves you from re-rigging later.

Stage 5: Animate and take the character to screen
For games, the rigged character goes into Unity, Unreal or Godot and picks up your existing animation set through retargeting. Check foot contact and finger placement first; those are where retargeted clips break.
For 2D animation and video work, the turnaround sheet is the asset, and you drive motion from it directly using image-to-video models with the sheet views as reference frames. Our guide to creating animations with AI tools walks through that route in detail, and the AI animation maker covers the shot-level version.
Style transfer belongs at the end, not the beginning. Locking a character in a neutral rendering style and applying the final look afterwards, the same principle behind turning photos into anime, keeps the identity stable when art direction changes mid-project.

Where teams lose time
Four failure patterns account for most wasted work:
- Skipping the turnaround. The character looks great in one pose and cannot be reproduced in another. Every later stage inherits the problem.
- Designing at 4K. Detail that vanishes at gameplay scale costs generation time and texture memory for nothing. Design at the size players will see.
- Re-prompting instead of re-referencing. Words are a lossy way to describe a character you have already drawn. Pass the image.
- Rigging before retopology. Rigging a dense generated mesh means redoing the rig after the cleanup pass.
There is also an IP question worth settling early. Copyright treatment of purely AI-generated work varies by jurisdiction and is unsettled in several major markets, so studios shipping commercially keep a human-authored brief, human-selected concept passes and human cleanup in the chain. Running the stages as an inspectable graph rather than scattered tool sessions makes that authorship trail easy to keep, which is part of why teams move this work onto a single AI workflow canvas.
Try it yourself: open the character design workflow and run it with your own brief. The nodes are pre-configured with the brief-to-sheet setup described above.
FAQ
What is a character turnaround sheet and why do I need one? It is a single sheet showing the character in five orthographic views, usually front, three-quarter left, side, three-quarter right and back, at consistent scale and lighting. It is the reference every later stage reads from: 3D conversion needs the front and side views, animators need the back view, and any new AI generation of the character uses it as the identity anchor.
How do I keep an AI character consistent across poses and expressions? Stop describing the character in text and start conditioning on images. Feed the approved concept back as an image input, use pose control so the model changes camera angle rather than redesigning, and once you have 15 to 30 approved images, train a small character adapter that locks identity for the rest of the project.
What is the difference between text-to-3D and image-to-3D? Text-to-3D generates a mesh from a written description, so it invents a new design each time and discards your concept work. Image-to-3D generates from your approved views, preserving the character you already designed. Use image-to-3D for characters and text-to-3D only for disposable background props.
Which file formats do game engines need? FBX and glTF are the safe defaults, with OBJ as a fallback for static meshes. Ship a full PBR texture set, diffuse, roughness, metallic and normal, rather than a single baked colour texture, or the character will not respond correctly to in-engine lighting.
Can AI replace character artists and riggers? Not for the parts that decide quality. AI compresses the mechanical middle: generating variations, producing turnaround views, building base meshes and rigging bipeds. The brief, the selection between options, art direction, retopology and non-humanoid rigging remain human work, and teams that remove those steps produce assets that look generic and behave badly in engine.
How long does the pipeline take compared with traditional modelling? The concept-to-turnaround stage compresses the most, often from days to hours, because variation and view generation are the parts AI does well. Cleanup, rigging and engine integration compress far less, so the savings are front-loaded and the back half still runs at close to normal speed.
What resolution should I generate at? Turnaround views at 2048 pixels per view, textures tiered by role at 512px for background characters, 1K for NPCs and 2K for hero characters. Reserve 4K for concept art you will never ship as a texture.
Do I own the copyright to an AI-generated game character? It depends on jurisdiction and on how much human authorship is in the chain, and the position is still moving in several major markets. The practical stance most studios take is to keep human-authored briefs, human selection between generated options, and human cleanup work documented, so there is a clear record of authorship behind the shipped asset.
Conclusion
AI has not removed the craft from character design; it has moved it. The brief, the selection, and the identity lock are now where a character is won or lost, and the generation steps between them are fast enough that the pipeline only breaks when a stage is skipped. Build the turnaround, condition on images instead of words, and check your triangle counts and bone limits before rigging. Keeping all five stages in one connected chain, which is what Wireflow's canvas is for, is what makes the character you approved on day one the same character that ships.

Co-Founder & Operations at Wireflow
Runs client operations and content strategy at Wireflow. Works directly with creative teams and agencies to build production AI workflows.
- Content Strategy
- Client Operations
Get unlimited ad creatives today.
One call to see if we are a fit and scope the first ad. If it fits, your first batch lands inside week one.